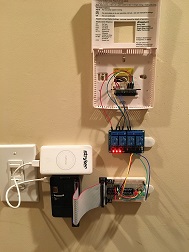
This project was inspired by the awful insulation in my home. I had a problem: every morning when I woke up, I would be hesitant to get out of bed because it was so dang cold in my house. I could run the heat all night, but that would take a toll on my heating bill. Most modern home thermostats are programmable: you can set a time when it is to activate, how long to run for, and sometimes even which portion of your house receives heat and/or cooling. I have a dumb home thermostat.
My first task was to figure out how to interface with the heating and cooling system. After removing the current thermostat module and thanks to a bit of YouTube and online research, I was able to route power to the heater, the AC module, and the fan. By jumping power from the power supply to any of these terminals, they would become active.
The next step was to implement a control system. I wanted to be able to control the temperature either from my bed or automatically, so a mobile application would be ideal. However, for a first go using a laptop would be sufficient for the extent of this project. I decided to try to use what I had on hand, which included a Raspberry Pi 3.0 and some wiring. I quickly realized that in order to use the same power supply that I used to "jump" power previously, I would need another control system besides the RPi.
The RPi has several GPIO (General Purpose Input Output) pins that can be used for, as the name suggests, measuring input voltage or putting out voltage. Because the goal is to route power rather than output power, I would need another tool. I did some research and found out about the relay module, which is essentially an electrically-controlled switch. By using one of the output GPIO ports on the RPi, I could send a signal to the relay module, telling the switch to either turn on or off. On either side of this switch was the input power from the thermostat system and the output power to one of the heating/cooling modules (heat, AC, or fan). I also hooked up the output ports on the RPi to some LED's so I could know when power was being delivered to the relay module and subsequently when the heat, AC, or fan was turned on.
The last piece was to add in a temperature probe such that the temperature could be monitored and provide feedback to the heating system on when to turn on or off. This way, I could tell my RPi to turn the heat on at a certain time, then stay on until a certain temperature is reached.
The rest is all just boring programming. Now that I could control a switch by sending a signal to my RPi, it was just a matter of mounting the gear and developing some code to control the system. As of today, I have developed code to tell the system when to run a certain program (i.e. turn on heat at 6 AM every weekday for one hour). I have also developed a program that uses the temperature probe to provide feedback and let the heat know when to turn on or off depending on the difference between the actual temperature and the setpoint. In the picture above the Raspberry Pi is being powered by a portable battery, but I soon realized that this would provide complications so I routed some cables in my house to be able to have an outlet close enough to reach the RPi power cord.
The next logical step in this project is to create a mobile or web application to provide a graphical user interface with which to control the system. Providing buttons like making a temperature set point, AC/heat/fan on/off buttons, and allowing the user to program a time to turn the system on/off would make this project complete. After all, my roommates need to be able to use it, not just me! I have a bit more to learn about remoting in to the RPi via a mobile device before I can implement any of these things, so once I figure that out I will update this post to document my progress.

